
Adeptus Titanicus - Legio Defensor Titan Build and Paint.
Evening Everyone! It's a little later than planned but the work life balance unfortunately requires some of the work part for the life part to continue lol
So I've teased around the inter web over the last week or so my new Reaver Titan for AT. I set myself a challenge last weekend to see if I could build and paint a Reaver Class Titan in 24hrs to a Table Top standard I would be happy with.

Did I do it....? Short answer ....No 😂
There's a fairly reasonable 'why'. I did state a Table Top standard I'd be happy with and well after the 24hr point I could have put it together and called it done. But in honesty I wouldn't have been happy and that's the key. So I continued to paint as I wanted to. So what you have today is a step by step guide to my painting and the journey so far.
I chose the Legio Defensor or Novaguard as I wanted to change up my pallet. As you may or may not know I'm painting my first Legio as Praesagius. The marbling effect I picked up from Myles over at Lil'Legend studio is such a fun way to paint. But it does require some concentration and a bit of practice I wanted something I could paint a little quicker.....or so I thought lol
I started by posing the legs after I had built a base. I decided to continue with a similar theme to the bases I have done for my Praesagius Titans. And you can find a tutorial for that here on the blog. I'll post a link at the bottom. 👍🏻


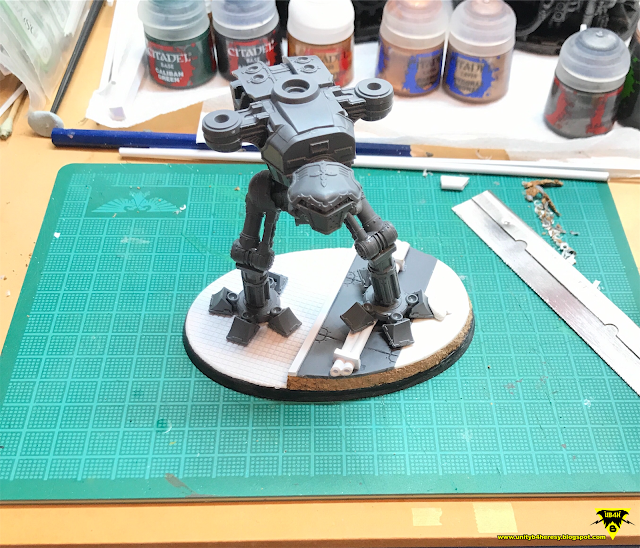
Once I was happy with the basic pose I took to priming the Titan skeleton, the base, weapons and armour plates all still on the sprue. I found for airbrushing the armour plates leaving them on the sprue is way easier and if you have the ability to do so I thoroughly recommend it.


To complete the Legio Defensor coloured 'Stripes' I used three Vallejo Game Air colours. Once I had masked off the area with Tamyia masking tape I prepped my colours:


So ladies and gents that's where I'm at. I think I've probably got another 5-6 hours worth of paint left to do including the weapons and then the final build. I'm really happy with how the Titan has come along and I plan to do the same process with two Warhounds starting this weekend so I will have a nice small Maniple complete hopefully by mid next week.
Time will tell 😂👍🏻
Titan basing tutorial link here :Basing Tutorial
Thanks for reading please comment below, ask any questions and don't forget to follow the blog to keep yourself updated.
Until next time
Only In Death Does Duty End
- Tylar
So I've teased around the inter web over the last week or so my new Reaver Titan for AT. I set myself a challenge last weekend to see if I could build and paint a Reaver Class Titan in 24hrs to a Table Top standard I would be happy with.

Did I do it....? Short answer ....No 😂
There's a fairly reasonable 'why'. I did state a Table Top standard I'd be happy with and well after the 24hr point I could have put it together and called it done. But in honesty I wouldn't have been happy and that's the key. So I continued to paint as I wanted to. So what you have today is a step by step guide to my painting and the journey so far.
I chose the Legio Defensor or Novaguard as I wanted to change up my pallet. As you may or may not know I'm painting my first Legio as Praesagius. The marbling effect I picked up from Myles over at Lil'Legend studio is such a fun way to paint. But it does require some concentration and a bit of practice I wanted something I could paint a little quicker.....or so I thought lol
I started by posing the legs after I had built a base. I decided to continue with a similar theme to the bases I have done for my Praesagius Titans. And you can find a tutorial for that here on the blog. I'll post a link at the bottom. 👍🏻


After the primer had dried I then laid down the base colours on the Titan base using Halfords Grey primer, a car primer used here in the U.K. and GW Zandri Dust rattle can. I then sprayed the skeleton and weapons with GW Leadbelcher. After the Leadbelcher had dried I washed the skeleton and weapons with Nuln Oil before moving onto the base.

I washed the paved area and the industrial grey area with Agrax Earthshade. When this dried I dry-brushed the paved area with Ushabti Bone, followed by a mix of Ushabti Bone and Cermite White, with a final dry-brush of Cermite White. Each time I did this I concentrated on slightly different areas so that it looked like the stone was stained where water may have puddled for instance. The industrial plates below the pipe work was painted with Mechanicum Standrad Grey with a few areas locked out with Leadbelcher then highlited with Stormhost Silver. The pipes were painted with Sycorax Bronze with the crushed area highlighted with Leadbelcher and then the whole pipe work washed with Nuln Oil.


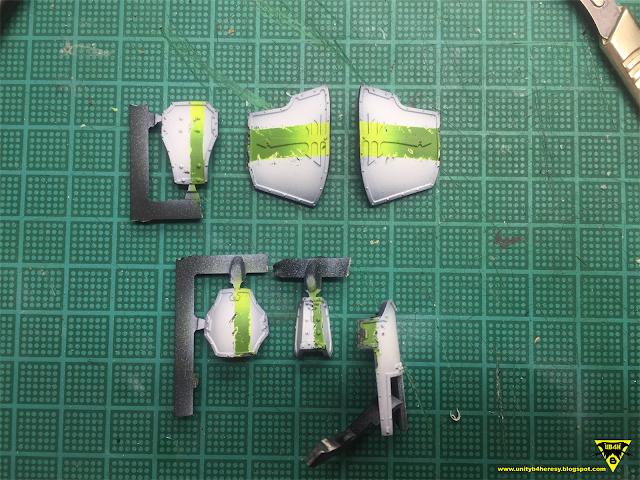
Next was the fun part. I airbrushed the armour plates with Vallejo Game Air Dead White. Once this was laid down I gave it a quick blast with the hairdryer. This is a key little piece of painting kit you'll need if you want to do any marbling but to aid when laying down layers of colour with an airbrush its essential.

- Light Livery Green - It's only just off a yellow
- Goblin Green
- Escopean Green

Once I'd given the armour another quick blast with the hairdryer I then looked to remove the raised edges where I had added layers of paint and to help 'weather' the armour. This process was helped by previously completing a test piece on a blank armour plate before hand. I can't stress enough that if you have the ability and time to do this always do a test piece. It will help you understand your pallet and it will allow you to skirt any pitfalls.


After I had done this and was happy I then began the very tedious job of edging the armour with Sycorax Bronze and I also blocked in the main Titanicus Heraldry plate with eagle and shield. After I had done this I switched fire briefly and painted in the optics on the faceplate. I then picked out the top of the Void Shield Generators with Gehenna's Gold.


Finally today I managed to get some time in to start blocking in the the Heraldry plate with Auroc Armour Gold on the Eagle I also did the same with the small Eagle on the chest torso armour and the Titanicus cog symbol on the knee armour plate. After this I began the armour wash process with Agrax Earthshade.


Time will tell 😂👍🏻
Titan basing tutorial link here :Basing Tutorial
Thanks for reading please comment below, ask any questions and don't forget to follow the blog to keep yourself updated.
Until next time
Only In Death Does Duty End
- Tylar
Hi! Your Legio Defensor was a Inspiration for me to build the same Legio too.
ReplyDeleteGreat Tutorial ! Alltoug i had a litte diffent approach. You can see my Reaver on Instagram:
https://www.instagram.com/p/B4dKtFSJ7Hl/
Thank you and keep up the good work!
Hey M0n5t3r! It's great to know we've been able to help other people create great minis. Tylar is hoping to follow up the Reaver with two Warhounds in the same scheme soon. Thanks for commenting don't forget to follow the blog so you don't miss out 😊
Delete